Saturday, September 26, 2020

Built my own Mutual Fund Tracker on Libreoffice Calc.

 I had used android app for tracking my Mutual Fund investments. I can also track the Funds in MyCams app.

Today I decided to build my own tracker using Libreoffice Spreadsheet.

AMFI updates NAVs of all Mutual Funds from India every day and one text file is available for previous day's NAVs.

I opened a Blank Sheet and clicked on Sheet/Link_to_external_Data_Source and entered the URL.and hit Enter.

The text file got loaded on the sheet.

Next I added another sheet and entered Scheme_Code, Fund Name, Date of purchase, NAV, Units allotted in the columns and added columns for current NAV and Date.

Then I used VLOOKUP function to get the values of currurent NAV and Date for the first entry in row 2 as follows:

For NAV =VLOOKUP(A2,$Sheet1.A$1:F$18034,5, )

For Date =VLOOKUP(A2,$Sheet1.A$1:F$18034,6, )

VLOOKUP function looks for the row having the value in A2 cell on Sheet1and picks up the value in column 5 for NAV and column 6 for Date,

Simple isn't it?

Sheet1 Data can be updated every day and Sheet2 containing the Data for my funds gets updated accordingly.

You may like to use the Date obtained through the above VLOOKUP function for further calculation by subtracting the Date of investment to get the total days of investment and the output of Date difference may produce error. To solve this do the following Settings:

Libreoffice Tools/Options/Libreoffice_Calc/Formula
Detailed Calculation Settings
Custom (conversion of text to numbers and more)
Details
Convert also locale dependent
Reference syntax for string reference Calc A1 | Excel A1


Wednesday, September 16, 2020

Running Manjaro Linux 20.1 Xfce edition with Linux Kernel 5.8.6-1 on acre aspire3.

 I downloaded and installed Manjaro 20.1 Xfce edition and installed replacing Zenwalk 15 milestone. The Xfce version is 4.14 (same as Zenwalk) but does not have the bugs I encountered on Zenwalk.


I could add the in keyboard through Xfce applet and switch it and could set the illumination using Fn+<> keys.

Manjaro installed Linux Kernel 5.8.6-1 by default and showing options of installing following kernels:


Tuesday, August 25, 2020

Adjusting Screen Brightness, Adding amsynth and Hindi Keyboard on Zenwalk 15 milestone 2020 XFCE 4.14.

 As posted in previous post I am having trial run of Zenwalk 15 milestone 2020 on my acer aspire Laptop. After adding the required software through Flatpak I started looking for a Synthesizer. On netpkg (the Zenwalk Cli only Package manager) you can search on one source at a time. After changing the source from slackware64-current to shrepos/current I could install amsynth and try my newly acquired usb midi controller. It worked well.

Screen brightness could not be set through the XFCE Widget. I used the commands:

 xrandr -q | grep " connected"

eDP connected 1366x768+0+0 (normal left inverted right x axis y axis) 344mm x 193mm

xrandr --output eDP --brightness 0.5

To reduce the brightness.

I need to use Hindi and Marathi on the Laptop so I added the indic keyboard but the Keyboard switching did not work. It seems to be a bug in XFCE Desktop.

Then I tried the good old command "setxkbmap -layout in" which resulted into following error:

Error loading new keyboard description

After googling I found that the culprit was the in symbol file in the newest version of xkeyboard (xkeyboard-config-2.30-noarch-1.txz).

I opened the file

bash-5.0# geany /usr/share/X11/xkb/symbols/in

and scrolled to line no 2329 =======

and commented out by putting # in front of it.

I tried the command "setxkbmap -layout in" once again and it worked.

Then I used the following to add the keyboard:

setxkbmap -layout "us,in"

and the XFCE Keyboard switcher also showed the two keyboards and the switching worked.

NB: XFCE 4.14 has a bug. I need to add the keyboard after every boot through the command:

setxkbmap -layout "us,in"

In a way it is good that I need to relearn the Linux commands to use Zenwalk Linux.

Thursday, August 20, 2020

Running Zenwalk 15.0 - milestone 2020. It is Fantastic!

 I downloaded zenwalk-current-15.0-200703a.iso and installed it on a spare partition on my acer aspire3. It is based on Slackware and has Xfce 4.14 desktop and Flatpak support.


The distribution came with minimum applications but I could add Firefox, libreoffice, gnucash, aiselriot from Flathub and start the trial run of the distribution.

I am yet to understand the netpkg package manager to update but Zenwalk is light weight and great!
and more it has become rolling distribution.

Thursday, May 21, 2020

Convert your QWERTY Keyboard into Accordion/Piano with VMPK.

VMPK is a wonderful Virtual MIDI Piano Keyboard. There are 128 instruments (called Program) to play. It has its own Synthesizer SonivoxEAS, so you don't need any other. I have played a song on it and recorded on Audacity without starting Jackd.

I used following keys:
vbhq wrt6
to play the song
"Jane Kahan Gaye Wo DIN" using Accordion. You can also try.


Saturday, May 09, 2020

Producing music is easier than playing music on a PC/Laptop.

As a child I learned to play Harmonium since there was one in the house. I also joined Vocal Indian Classical Music Class in the evening although there was a conflict whether to play in the ground (it was in front of our house) or go to music class in the evening. I passed Standard 8 of school and Intermediate level classical music at the same time but could not pursue music studies since there was a gap between the school closing and beginning of Music College and both were 3 Kms from my house and I could not walk the to and fro distance two times.

I used to play Flute in my College days (mostly Film Songs), directed College Orchestra, also bought Mouth Organ and Electric Guitar while working as a Trainee Enginner.

Recently I thought about converting my Laptop Keyboard into Midi Keyboard and the story begins.

As described in the last post I installed synthesizer played on it but it is not easy to play on QWERTY Keyboard compared to Harmonium, then connected my mobile phone through usb for Piano like keyboard.

Then I downloaded some Tabla/Drums wav files from Internet and played on their beats but did not like the quality of my music.

Finally I have discovered that producing music is easier than playing it on my Laptop.

I downloaded LMMS which was originally known as Linux Multimedia Studio but became cross platform for wider acceptance with the result that most popular plugin VST is based on Windows.

I searched for Tabla Loops and found free VST plugins.

I could not load VST plugins on LMMS installed on Ubuntu. Since I also have Windows 10 I installed LMMS on it and used the plugin.

Then I discovered that LMMS recommends that you install Wine on Ubuntu, download their AppImage from there website make it executable and run it on wine.

I find that it runs better on Ubuntu+Wine compared to Windows 10. I could load the VST plugin.

I made some preliminary music.
Yaman
Trital


Friday, May 01, 2020

Using amsynth Synthesizer on Ubuntu.


I installed amsynth synthesizer and jack-keyboard:
sudo apt install amsynth
sudo apt install jack-keyboard

I started QJackCtl
Clicked Setup/Settings/Midi_Driver/seq Advanced/Output_Device/hw:Generic, 0
Advanced/Input_Device/hw:Generic, 0 Ok
Then I clicked on Start

Then I started amsynth and Jacke-keyboard
On Jack-keyboard clicked on Connect/system:midi_playback_2

Selected BriansBank01 on amsynth

and started playing on Keyboard

V B N J Q W E R

which played the notes

सा रे ग म प ध नी सा

Next I need to record what is being played.

sudo apt install jack-capture
sudo adduser <username> audio
jack_capture -mp3

and I made first attempt to play a song and result is as follows:
Shared file on Drive.

Update 04 May 2020
Today I hooked up android midi keyboard to the Laptop:


Notice the Jack Connection:


Thursday, April 23, 2020

Running Lubuntu 20.04 LXQt Desktop through USB

I was impressed with ExTiX LXQt desktop and decided to try Lubuntu 20.04 which has the same LXQt Desktop. I downloaded Lubuntu current image of ISO and prepared persistent USB using mkusb and booted into it. Here is how it looks:

The app for updating and installing additional software is called Discover:
 Since it was Live USB I had to select Locale:
 

Friday, April 17, 2020

Running ExTIX LXQt Mini Linux from USB with persistence.

I was looking for a Linux Distribution with Linux Kernel 5.6 and came to know about ExTix Linux with a Tagline The Ultimate Linux System. It is based on Ubuntu 20.04 built with Custom Kernel 5.6.2-exton and has LXQt Desktop version 0.14.1. which is being touted as A lightweight, modular, blazing-fast and user-friendly desktop environment.

I downloaded the iso and copied it to USB and booted and I was impressed with its speed and low memory usage.

I decided to stick with it but wanted persistence since it came only with Firefox Browser.

I used mkusb on Ubuntu 18.04 to make another installation on the same USB drive but this time with persistence. It worked since the distribution is based on Ubuntu.

The distribution is very simplistic and has the grand old Synaptic Package Manager but I am familiar with it since I am using Linux for 15 years. I applied updates and installed libreoffice, gnucash, Solitair and Mahjongg which I require on daily basis.

I am happily running ExTiX Linux LXQt version with Linux 5.6.2 from USB persistence and may install it to hard disk later.

NB: mkusb makes usbdata partition which I am using to keep the gnucash and libreoffice files which can be used also on installed Endless OS and Ubuntu 18.04.

Friday, March 13, 2020

Windows 10 in triple boot with Endless OS, Ubuntu 18.04 on acer aspire 3.

I bought acer aspire 3 with Endless OS pre-installed in Oct 18 after my Lenovo Laptop was broken. Subsequently I installed Ubuntu 18.04 in dual boot on this Laptop in dual boot.

Recently I came to know that Windows 10 installer allows installation on a partition. I downloaded Windows 10 ISO and made bootable USB stick using WoeUSB on Ubuntu 18.04 as posted in may last post.

I created 90 GB NTFS partition and booted on Windows 10 usb. I selected Windows 10 Home Single Language edition which was installed earlier on Lenovo Laptop. After choosing Custom install I selected the partition and installed Windows 10.

After install I could configure Windows 10 and boot into the Desktop.

Later on I changed the boot sequence in BIOS and changed to Ubuntu 18.04 Grub 2. After booting in Ubuntu 18.04 and updating grub I got the Windows 10 boot entry in grub 2.

Tuesday, March 10, 2020

Using WoeUSB on Ubuntu 18.04 to make bootable Windows 10 USB stick.

Windows 10 installer ISO is freely available on Microsoft site. Microsoft recommends its media creation tool which does not work on Ubuntu. WoeUSB is a utility which can be used to create boot-able usb stick from Windows 10 ISO. To install on Ubuntu:
sudo add-apt-repository ppa:nilarimogard/webupd8
sudo apt update
sudo apt install woeusb
Insert USB stick larger than 8 GB formatted with single partition.
Run WoeUSB, select Windows 10 ISO.
Select NTFS File System since FAT does not support files larger than 4 GB.
Select target device USB stick (say /dev/sdb)
Unmount the partition opening a terminal
sudo umount /dev/sdb1
Click on install.

WoeUSB will make bootable USB stick with Windows 10 installer.

Tuesday, December 24, 2019

Installing Broadcom b43 driver offline on HP Pavilion dv6.

My friend installed Ubuntu 18.04 on HP Pavilion dv6 but Wi-Fi did not work on the Broadcom wifi adoptor. Moreover Ethernet did not work.

I downloaded following files on my mobile phone and sent to him on WhatsApp:
b43-fwcutter_019-3_amd64.deb from packages Ubuntu 18.04.
broadcom-wl-5.100.138.tar.bz2 from iwfinger.com

This friend was not familiar with Linux commandline and I had to make many calls and WhatsApp messages to execute following instructions.
Keep the files on Home folder and open terminal.
$ sudo dpkg -i b43-fwcutter_019-3_amd64.deb
$ tar xfvj broadcom-wl-5.100.138.tar.bz2
$ sudo b43-fwcutter -w /lib/firmware broadcom-wl-5.100.138/linux/wl_apsta.o

Reboot.
It works.

Monday, October 21, 2019

Using Podman Container on Endless OS to get Finance::Quote.

Endless OS came pre-installed on my acer aspire3 bought last year I started liking it but I had installed Ubuntu 18.04 in dual boot because I was not familiar with flatpak apps only type of Linux Distributions. Moreover, the main problem I noticed that the flatpak version of Gnucash did not have Finance::Quote which updates NAV of ny investments on daily basis.

I posted about this requirement on Endless OS Community and one of their developer posted on Github asking what was the program to include Finance::Quote on the flatpak version last December.

Recently I posted about this problem and I was introduced to Podman through which I built a Container with Ubuntu 19.10 mini ISO (75.2 MB).
Podman is a Cli only utility.

mkdir ~/sharing This directory will share the files on the host with Container.

podman image pull ubuntu:19.10
podman run --interactive --tty --name mycontainer\
--volume /tmp/.X11-unix:/tmp/.X11-unix \ --env DISPLAY --device /dev/dri --device /dev/snd --device /dev/input \ --volume /etc/localtime:/etc/localtime:ro \
--volume /sysroot/home/$(whoami)/sharing:/mnt ubuntu:19.10

root@ca50d6597e9c:/#
Then I created a User (Username same as on Endless OS)
root@ca50d6597e9c:/# useradd -d /home/username -s /bin/bash username mkdir -p /home/username chmod -R 700 /home/username chown -R username:users /home/username

exit

Next I installed Gnucash in the Container:
$ podman start mycontainer
$ podman exec --interactive --tty mycontainer /bin/bash
root@ca50d6597e9c:/# apt update
# apt install gnucash

Gnucash got installed pulling all its dependencies
# exit

Before running the Container I had put the file myaccount.gnucash in the ~/sharing folder.

Next I had to run Gnucash in the Container using the Display of Endless OS.
$ podman start mycontainer
$ xhost +
$ podman exec --interactive --tty --user $(whoami) --workdir /home/$(whoami) mycontainer/bin/bash

Username@ca50d6597e9c:/$ gnucash /mnt/myaccount.gnucash
Gnucash opened using Display of host.
I updated the NAVs through Tools/Price_Deskto/Get_Quotes

exit
$ podman stop mycontainer

I could have updated the NAVs through Commandline also:
Username@ca50d6597e9c:/$ gnucash --add-price-quotes /mnt/myaccount.gnucash

OR
Just typing the following on the host:
$ podman start mycontainer
$ docker exec -it mycontainer gnucash --add-price-quotes /mnt/myaccount.gnucash without using GUI.


Wednesday, October 02, 2019

How to connect VGA Monitor to Laptop through HDMI Port.

As described in last post my Acer Aspire3 is showing strange colours. I am using it as it is till the Service Centre gets the spare.

I connected the HDMI port of the Laptop to TV and found that it is ok on TV. Then I decided to use VGA Monitor and bought HDMI to VGA Converter shown below:
After booting Ubuntu I selected Single Display as the Monitor:
and using it now.


Friday, September 27, 2019

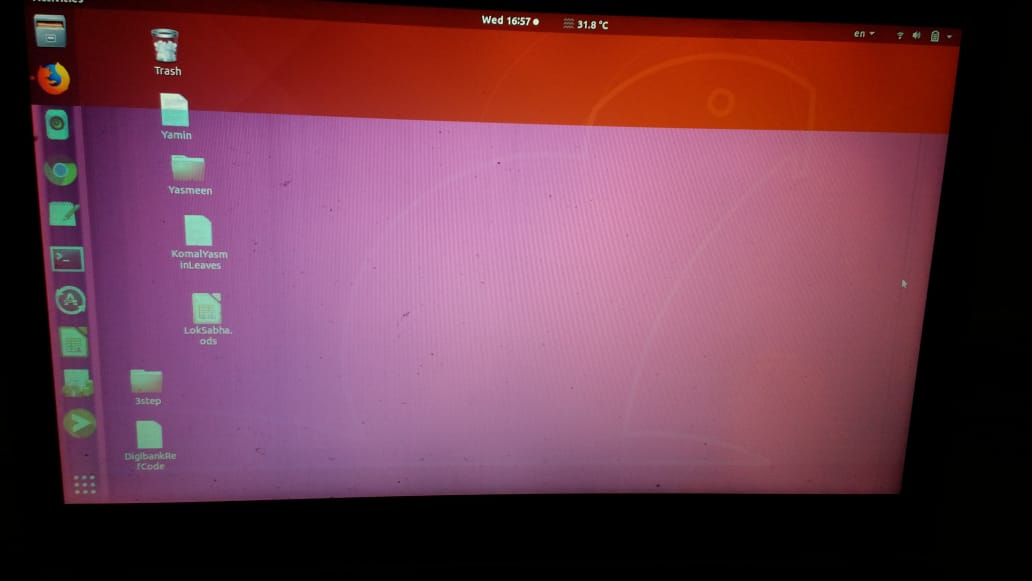
My Acer Aspire3 A315-21-43WX is showing strange colours.

NB: I have updated this post on Oct 2, 2019 and replaced the images since the earlier images were screenshots which looked as described on my Laptop but not to others. Today I have taken photos instead of screenshots.
My Acer Aspire A315-21-43WX is showing strange colours. See the Screenshot of the Ubuntu 18.04 Background below:

and notice the light blue instead of white background on the text editor below:

When I type the letters are appearing in violet colour instead of black as I am writing this post.
Thank God the Laptop is under warranty of one year since I purchased on amazon on October 10, 2018.

 I have lodged a complaint to acer, took the Laptop to Service Center yesterday and got it back today. I will give it to them for parts replacement when it arrives at the Service Center. Meanwhile I am using it as it is.

Thursday, August 15, 2019

I rooted our old phone Karbonn Sparkle V (Android One).

We had purchased Android one Phone (Karbonn Sparkle V) in Sep 14 when it was launched. It came with Android 4.4.4 (Kitkat) which was updated to Android 6.0.1 (Marshmellow) in 2016. This phone has only 1 GB RAM which was inadequate to run and update Whatsapp and Facebook Lite since it had pre-installed apps Moneycontrol, Snapdeal, OLX which we don't use and occupying memory.

The solution was to remove the pre installed apps which was possible after rooting the phone.

Attempt to root an Android phone has risk of loosing the phone if it becomes un bootable. Since this phone has a resale value of Rs 500/- only I decided to take the risk.

For rooting the phone you need to connect it to Laptop/PC through USB after invoking the Developer options by clicking 7 times on Build number and enable USB de bugging.through it and you have to allow install from Unknown Sources.
You also need to download Android One Toolkit on your Laptop/PC and try. I tried this but could not root the phone.

After further research I came to know that I needed to download Super SU and ThunderZap and copy it to the root of SD Card.

This procedure was described on Youtube.

After making two or three attempts using this procedure I could root the phone.
I confirmed rooting by the app Root Checker.

Then I downloaded SuperSU for granting root permission to the apps and remove the pre installed apps by using System app remover after granting root permission to it.

Now this phone is usable for regularly updating Whatsapp and Facebook Lite.


Sunday, March 24, 2019

Draw on your Screen

I have read about Draw on your Screen on OMGUbuntu site and installed the Gnome Shell Extension on Ubuntu 18.04.

I am not good at drawing but I will try to draw and add the screenshot below:


Thursday, March 21, 2019

How to add Radio City Internet Radio to Rhythmbox.

Rhythmbox is a native music app on Ubuntu. It has some built in Radio Stations but I don't listen to them.
Today I tried to add one Radio City Lata Mangeshkar Radio on Rhythmbox as follows:
I opened the webpage Lata Mangeshkar Radio and it started playing on small window at the bottom of the page.
I right clicked on the small window and selected view page info which opened on a pop up.
I selected Media and looked for Audio URL and copied the URL.
In Rhythmbox/Radio I clicked on Add button at the top and added the URL and clicked on Play symbol.
After clicking on Play the Radio got added as Radio City Lata Radio.


Tuesday, March 19, 2019

Ubuntu 19.04 with Linux Kernel 5.0

Linux Kernel 5.0 was released on 4th March 2019. Ubuntu 19.04 Daily Live was updated with Linux 5.0 yesterday. I downloaded the ISO and wrote it on USB stick and running it now on my ASUS Aspire 3:

Monday, March 04, 2019

How to type Degrees Symbol "°" on Ubuntu

Today I wanted to locate a place on Google Maps by typing Latitude and Longitude values. It had Degrees symbol.

This is how I typed the Degrees symbol
Hold Ctrl+Shift+u then type b0 and press enter. This will get you the symbol
°

Filed ITR2 with Zero income tax on Capital Gain taking help of Claude AI.

  I file income tax return on my own (without any help from anyone) every year. But this year I decided to take the help of Claude AI primar...