Tuesday, December 24, 2019

Installing Broadcom b43 driver offline on HP Pavilion dv6.

My friend installed Ubuntu 18.04 on HP Pavilion dv6 but Wi-Fi did not work on the Broadcom wifi adoptor. Moreover Ethernet did not work.

I downloaded following files on my mobile phone and sent to him on WhatsApp:
b43-fwcutter_019-3_amd64.deb from packages Ubuntu 18.04.
broadcom-wl-5.100.138.tar.bz2 from iwfinger.com

This friend was not familiar with Linux commandline and I had to make many calls and WhatsApp messages to execute following instructions.
Keep the files on Home folder and open terminal.
$ sudo dpkg -i b43-fwcutter_019-3_amd64.deb
$ tar xfvj broadcom-wl-5.100.138.tar.bz2
$ sudo b43-fwcutter -w /lib/firmware broadcom-wl-5.100.138/linux/wl_apsta.o

Reboot.
It works.

Monday, October 21, 2019

Using Podman Container on Endless OS to get Finance::Quote.

Endless OS came pre-installed on my acer aspire3 bought last year I started liking it but I had installed Ubuntu 18.04 in dual boot because I was not familiar with flatpak apps only type of Linux Distributions. Moreover, the main problem I noticed that the flatpak version of Gnucash did not have Finance::Quote which updates NAV of ny investments on daily basis.

I posted about this requirement on Endless OS Community and one of their developer posted on Github asking what was the program to include Finance::Quote on the flatpak version last December.

Recently I posted about this problem and I was introduced to Podman through which I built a Container with Ubuntu 19.10 mini ISO (75.2 MB).
Podman is a Cli only utility.

mkdir ~/sharing This directory will share the files on the host with Container.

podman image pull ubuntu:19.10
podman run --interactive --tty --name mycontainer\
--volume /tmp/.X11-unix:/tmp/.X11-unix \ --env DISPLAY --device /dev/dri --device /dev/snd --device /dev/input \ --volume /etc/localtime:/etc/localtime:ro \
--volume /sysroot/home/$(whoami)/sharing:/mnt ubuntu:19.10

root@ca50d6597e9c:/#
Then I created a User (Username same as on Endless OS)
root@ca50d6597e9c:/# useradd -d /home/username -s /bin/bash username mkdir -p /home/username chmod -R 700 /home/username chown -R username:users /home/username

exit

Next I installed Gnucash in the Container:
$ podman start mycontainer
$ podman exec --interactive --tty mycontainer /bin/bash
root@ca50d6597e9c:/# apt update
# apt install gnucash

Gnucash got installed pulling all its dependencies
# exit

Before running the Container I had put the file myaccount.gnucash in the ~/sharing folder.

Next I had to run Gnucash in the Container using the Display of Endless OS.
$ podman start mycontainer
$ xhost +
$ podman exec --interactive --tty --user $(whoami) --workdir /home/$(whoami) mycontainer/bin/bash

Username@ca50d6597e9c:/$ gnucash /mnt/myaccount.gnucash
Gnucash opened using Display of host.
I updated the NAVs through Tools/Price_Deskto/Get_Quotes

exit
$ podman stop mycontainer

I could have updated the NAVs through Commandline also:
Username@ca50d6597e9c:/$ gnucash --add-price-quotes /mnt/myaccount.gnucash

OR
Just typing the following on the host:
$ podman start mycontainer
$ docker exec -it mycontainer gnucash --add-price-quotes /mnt/myaccount.gnucash without using GUI.


Wednesday, October 02, 2019

How to connect VGA Monitor to Laptop through HDMI Port.

As described in last post my Acer Aspire3 is showing strange colours. I am using it as it is till the Service Centre gets the spare.

I connected the HDMI port of the Laptop to TV and found that it is ok on TV. Then I decided to use VGA Monitor and bought HDMI to VGA Converter shown below:
After booting Ubuntu I selected Single Display as the Monitor:
and using it now.


Friday, September 27, 2019

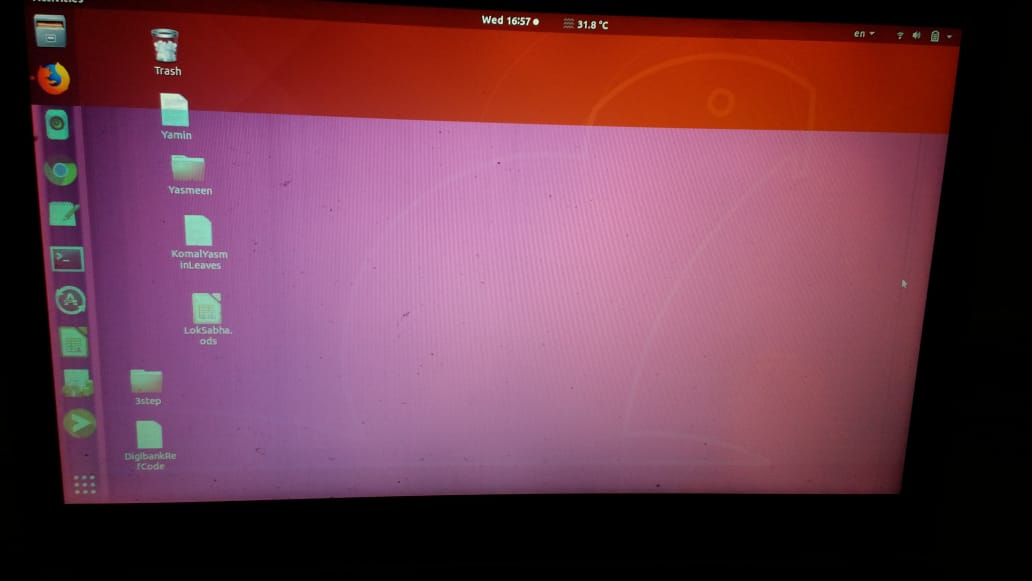
My Acer Aspire3 A315-21-43WX is showing strange colours.

NB: I have updated this post on Oct 2, 2019 and replaced the images since the earlier images were screenshots which looked as described on my Laptop but not to others. Today I have taken photos instead of screenshots.
My Acer Aspire A315-21-43WX is showing strange colours. See the Screenshot of the Ubuntu 18.04 Background below:

and notice the light blue instead of white background on the text editor below:

When I type the letters are appearing in violet colour instead of black as I am writing this post.
Thank God the Laptop is under warranty of one year since I purchased on amazon on October 10, 2018.

 I have lodged a complaint to acer, took the Laptop to Service Center yesterday and got it back today. I will give it to them for parts replacement when it arrives at the Service Center. Meanwhile I am using it as it is.

Thursday, August 15, 2019

I rooted our old phone Karbonn Sparkle V (Android One).

We had purchased Android one Phone (Karbonn Sparkle V) in Sep 14 when it was launched. It came with Android 4.4.4 (Kitkat) which was updated to Android 6.0.1 (Marshmellow) in 2016. This phone has only 1 GB RAM which was inadequate to run and update Whatsapp and Facebook Lite since it had pre-installed apps Moneycontrol, Snapdeal, OLX which we don't use and occupying memory.

The solution was to remove the pre installed apps which was possible after rooting the phone.

Attempt to root an Android phone has risk of loosing the phone if it becomes un bootable. Since this phone has a resale value of Rs 500/- only I decided to take the risk.

For rooting the phone you need to connect it to Laptop/PC through USB after invoking the Developer options by clicking 7 times on Build number and enable USB de bugging.through it and you have to allow install from Unknown Sources.
You also need to download Android One Toolkit on your Laptop/PC and try. I tried this but could not root the phone.

After further research I came to know that I needed to download Super SU and ThunderZap and copy it to the root of SD Card.

This procedure was described on Youtube.

After making two or three attempts using this procedure I could root the phone.
I confirmed rooting by the app Root Checker.

Then I downloaded SuperSU for granting root permission to the apps and remove the pre installed apps by using System app remover after granting root permission to it.

Now this phone is usable for regularly updating Whatsapp and Facebook Lite.


Sunday, March 24, 2019

Draw on your Screen

I have read about Draw on your Screen on OMGUbuntu site and installed the Gnome Shell Extension on Ubuntu 18.04.

I am not good at drawing but I will try to draw and add the screenshot below:


Thursday, March 21, 2019

How to add Radio City Internet Radio to Rhythmbox.

Rhythmbox is a native music app on Ubuntu. It has some built in Radio Stations but I don't listen to them.
Today I tried to add one Radio City Lata Mangeshkar Radio on Rhythmbox as follows:
I opened the webpage Lata Mangeshkar Radio and it started playing on small window at the bottom of the page.
I right clicked on the small window and selected view page info which opened on a pop up.
I selected Media and looked for Audio URL and copied the URL.
In Rhythmbox/Radio I clicked on Add button at the top and added the URL and clicked on Play symbol.
After clicking on Play the Radio got added as Radio City Lata Radio.


Tuesday, March 19, 2019

Ubuntu 19.04 with Linux Kernel 5.0

Linux Kernel 5.0 was released on 4th March 2019. Ubuntu 19.04 Daily Live was updated with Linux 5.0 yesterday. I downloaded the ISO and wrote it on USB stick and running it now on my ASUS Aspire 3:

Monday, March 04, 2019

How to type Degrees Symbol "°" on Ubuntu

Today I wanted to locate a place on Google Maps by typing Latitude and Longitude values. It had Degrees symbol.

This is how I typed the Degrees symbol
Hold Ctrl+Shift+u then type b0 and press enter. This will get you the symbol
°

Saturday, January 05, 2019

Installing latest version of youtube-dl

youtube-dl is used to download Youtube videos. If you find that youtube-dl is not able to download a particular video you can uninstall the version of the distribution and install from github as follows:

sudo apt-get remove -y youtube-dl
sudo wget https://yt-dl.org/latest/youtube-dl -O /usr/local/bin/youtube-dl
sudo chmod a+x /usr/local/bin/youtube-dl
hash -r
Good luck downloading Youtube videos.

Thursday, November 15, 2018

Ubuntu 18.04 in dual boot with Endless OS

 I bought Acer Aspire 3 Model A315-21 which came with pre-installed Endless OS. I could install Ubuntu 18.04 after resizing the Endless OS partition. But the grub of Ubuntu did not pick up the entry of Endless OS. I asked question on Ask Ubuntu and was told to add the following menu entry in /etc/grub.d/40_custom
menuentry "Endless" { insmod part_gpt insmod fat set root='hd0,gpt1' if [ x$feature_platform_search_hint = xy ]; then search --no-floppy --fs-uuid --set=root --hint-bios=hd0,gpt1 --hint-efi=hd0,gpt1 --hint-baremetal=ahci0,gpt1 1234-abcd else search --no-floppy --fs-uuid --set=root 1234-abcd fi chainloader /EFI/endless/shim.efi}

I was told to replace two instances of "1234-abcd" by UUID of /dev/sda1 which is EFI partition created by Endless OS. The above menu entry chainloads the grub installed by Endless OS.

After booting there was no chance of selecting the above menu entry since the grub menu was hidden.

I opened /etc/default/grub and changed the following lines:
GRUB_TIMEOUT_STYLE=hidden
GRUB_TIMEOUT=0in
to:
#GRUB_TIMEOUT_STYLE=hidden
GRUB_TIMEOUT=10
I could chainload the grub of Endless OS but it was not booting and I had to disable secure boot.

Interestingly the Endless OS boots with secure boot on if I choose the grub of Endless OS in BIOS

NB: Since Ubuntu 18.04 had bug of grub install I downloaded Daily/Live image of Ubuntu 18.04 in which the bug has been removed.


Monday, November 05, 2018

Installed Peppermint Linux on Lenovo Ideapad S100

I am presently at Bhopal and these people have Lenovo Ideapad S100 with Windows 7. Last time I had tried antiX Linux on USB boot on this machine.

This time I found that they had to reformat the disk and reinstall Windows 7 which was not working well.

When I boot this Laptop on Windows 7 there were auto key presses of space bar for sometime. Afterwards I could use it but space bar did not produce "space". I had to use onscreen keyboard for typing "space".

I decided to try Linux on the machine and since it has only 2 GB RAM I decided to try Peppermint Linux.

I downloaded Peppermint 9 (32 bit), checked md5sum, bought SanDisk from local market and made bootable usb disk using Rufus.

This Laptop is not friendly for USB booting. On Lenovo Laptops pressing F12 is supposed to show boot menu but the Laptop does not have F12 key and suppose to work with Fn+F11 but Fn does not work on BIOS.

I pressed F2 to enter the BIOS Set up but there is no option to bring up the USB boot option above HDD boot, however, the BIOS suggests that you could disable HDD boot option by putting "x" after selecting it and pressing x key.

After disabling HDD boot I could boot from USB. The Space Bar key did not work on Live Peppermint Desktop and I had to install "onboard" to get onscreen keyboard.

Even then I decided to install Peppermint in dual boot with Windows 7.

After install and booting Peppermint Desktop once again I had to install "onboard" and use it for space bar.

After applying all updates, however, I find that the Space Bar key is working.

Mission successful.

Saturday, October 13, 2018

Endless OS pre-installed on Acer Aspire 3.

 I bought Acer Aspire 3 Model A315-21 on Amazon during current Great Indian Festival. Regarding OS Amazon stated:

  • Operating System: This is an Elinux -based laptop. Requires separate purchase and installation of operating system software (like Windows), not included in the box. Refer to Acer website for drivers

Since it says "Requires separate purchase and installation of operating system software" I thought nothing would be pre-installed and I was ready to install Ubuntu 18.04.

But it came pre-installed with Endless OS and I am very much impressed with the modern Linux Operating System.

See what is says in the QA below:

Why can't I use apt-get, dpkg, dnf, or rpm commands?

Most desktop Linux distributions are oriented towards tech-savvy users and developers, but Endless OS isn't your typical Linux distribution. We have a different target user. We don’t use rpm, apt, or any other packaging system. We use a read-only root file system managed by OSTree with application installed using Flatpak.

You may notice that the apt-get and dpkg commands are installed. This is because Endless OS is based on Debian, and these commands are used while creating Endless OS. Each release is a read-only snapshot, so you can use commands like dpkg -l which do not make changes to the system, but you cannot use commands like apt-get install.

For more information on the open-source software used to build Endless OS, see the Developers page on our website.

Wednesday, September 26, 2018

Booting daily-live/current cosmic-desktop-amd64.iso from Grub2 and updating it using zsync.

Today I downloaded Ubuntu 1810 Cosmic Cuttlefish Live ISO

    wget -c http://cdimage.ubuntu.com/daily-live/current/cosmic-desktop-amd64.iso


 and used it booting from Grub2 menu entry as follows:

    sudo gedit /etc/grub.d/40_custom

and added the following lines:

    menuentry "Cosmic Desktop iso" {
            set isofile="/home/user/cosmic-desktop-amd64.iso"
            loopback loop (hd0,X)$isofile
            linux (loop)/casper/vmlinuz.efi boot=casper iso-scan/filename=$isofile noprompt noeject
            initrd (loop)/casper/initrd
    }

then I updated grub to add the menuentry:

    sudo update-grub

I could boot from the ISO selecting Cosmic Desktop iso from menu.

Today I decided to keep the ISO updated and installed zsync and used it to update.

    sudo apt-get install zsync -y
    zsync http://cdimage.ubuntu.com/daily-live/current/cosmic-desktop-amd64.iso.zsync
    #################### 100.0% 108.2 kBps DONE  

    reading seed file wily-desktop-amd64.iso: **************************************************************************************************************************************************************************************************************************************************************************************************************************************************************************************************************************************************************************************************************************************************************************************************************************************************************************************************************************************************************************************************************************************************************************************************************************************************************************************************************************************************************************************************************************************************************************************************************************************************************************************Read wily-desktop-amd64.iso. Target 100.0% complete.   
    verifying download...checksum matches OK
    used 1257062400 local, fetched 0

Since it is less than 24 hours it says " fetched 0"

If you want to use the method please note that the ISO is on /home folder of the user. Put your username replacing user and X in (hd0,X) as your partition no X.

Sunday, September 02, 2018

Enabling tapping on touchpad on Debian Mate Desktop.

I installed Mate Desktop on Debian 9 "Stretch" recently and found that tapping on touchpad did not work and the setting was missing in Mate Control Centre.

After searching I found the solution on Debian Wiki
# mkdir -p /etc/X11/xorg.conf.d
# echo 'Section "InputClass"
        Identifier "libinput touchpad catchall"
        MatchIsTouchpad "on"
        MatchDevicePath "/dev/input/event*"
        Driver "libinput"
        Option "Tapping" "on"
EndSection' > /etc/X11/xorg.conf.d/40-libinput.conf


Thursday, June 28, 2018

Outage of Chromecast on June 27 2018

There is a 10:30 PM serial on Zee Marathi (Grahan) which does not have repeat telecast in the day.

We watch it through Zee5 and Chromecast on our TV next day morning.

We could watch it on 27th June in the morning but later on when I tried to use Videostream on Chromecast it did not work.

I tried rebooting, Factory Reset on Chromecast, restarting Wifi but nothing worked.

After searching on internet I came to know that it was Global issue.

Google resolved it and we could use Chromecast on 28th June morning.


Tuesday, May 29, 2018

Playing Music on Bluetooth Speaker artis BT 15 through SD Card.

As mentioned on previous post I bought artis BT 15 Bluetooth Speaker mainly to use with my mobile phone since its sound output is less.

The Bluetooth Speaker also has micro SD Card slot to play the songs on SD Card without connecting with any phone or Laptop.

I had one micro SD Card and SD Adapter to mount it on Laptop. After mounting the card it got mounted as read only.

I checked the Adapter and it had a hardware lock switch to write protect it. After putting the switch in unlock position it got mounted as rw.

I copied the Music Folder with its contents from the Laptop on the micro SD Card.

After inserting the card in the slot on Bluetooth Speaker I could play the songs on the Speaker.

Now I don't need any mobile or Laptop to play those songs.

Sunday, May 27, 2018

Connecting Bluetooth Speakers for sound output on Ubuntu 16.04

I bought Bluetooth Speker artis BT15 mainly to use with my mobile Coolpad Mega 2.5D since the output volume of the phone for playing Jio TV is very less.

After using with the phone I thought to check it with Laptop although Laptop speakers are good enough.

I could pair and connect the Bluetooth Speaker and it was showing in System_Settings/Sound/Output as "Headset BT15" and I selected it but the Music was still playing through Laptop Speakers.

After searching askubuntu I got the solution:
  1. Change #AutoEnable=false to AutoEnable=true in the /etc/bluetooth/main.conf (notice new line is un-commented)
  2. Unpair the headset
  3. Restart the bluetooth service sudo /etc/init.d/bluetooth restart
  4. Pair your headset again and connect it
  5. Go to sound settings. From the output device tab you should now see the headset listed along with other output device like internal speakers
  6. Choose it as the sound output device.

Saturday, April 28, 2018

Installing Ubuntu 18.04 Bionic Beaver on Lenovo G50-45

My Lenovo G50-45 has Windows 10 and Ubuntu 16.04, Debian 9 and two more partitions to install whatever Linux I feel like.

I downloaded Ubuntu 18.04 Desktop ISO on 27 April 2018 and tried to install on spare partition. It failed to install Grub with error message 'grub-efi-amd64-signed' package failed to install target/ and also wiped menu entries of Ubuntu 16.04 and Debian making my system unbootable.

I had to boot again on Ubuntu 18.04 Live USB, install and run Boot Repair to get the menu entries back.

Today I installed Ubuntu 18.04 once again with following command:
sudo ubiquity -b
which installed without Grub.

After login in Ubuntu 16.04 I updated grub and got the entries of Ubuntu 18.04 and could boot Ubuntu 18.04.

But for anybody trying to install Ubuntu 18.04 without any other Linux present should use following procedure on AMD machines:
 

1) Boot Ubuntu Live DVD/USB in testing mode and open terminal
2) Run installation process without installing bootloader by:
sudo ubiquity -b
3) Press "Continue testing" after installation is over.
4) Mount newly installed file system into /mnt:
sudo mount /dev/sda2 /mnt
sudo mkdir /mnt/boot/efi
sudo mount /dev/sda1 /mnt/boot/efi
for i in /dev /dev/pts /proc /sys; do sudo mount -B $i /mnt$i; done
(where sda2 is the root partition and sda1 is the efi partition)
5) Load efivars by:
sudo modprobe efivars
6) Reinstall grub-install for a 64bit version
sudo apt-get install --reinstall grub-efi-amd64
sudo grub-install --no-nvram --root-directory=/mnt
7) Change root to /mnt and update grub
sudo chroot /mnt
sudo update-grub
8) Move and rename the installed bootloader
cd /boot/efi/EFI
sudo cp -R ubuntu/* BOOT/
cd BOOT
sudo cp grubx64.efi bootx64.efi
9) Reboot the system.


Tuesday, April 17, 2018

Combining multiple video files into one video file.

I had four video files which were supposed to be played one after the other. After searching on Internet I learned about using ffmpeg.

I created mylist.txt file in the folder where the video files were kept.
file '3SRB_Stretching.mp4'
file '3SRB_Swiso.mp4'
file '3SRB_Refining_Exercise.mp4'
file '3SRB_Radhe_Krishna.mp4'

Then I opened terminal and typed following command after CD to the folder.
ffmpeg -f concat -safe 0 -i mylist.txt -c copy 3SRB.mp4

I got 3SRB.mp4 file which combined the four files in mylist.txt file.

How to Fix a Missing USB MIDI Keyboard in LMMS on Endless OS (Flatpak Guide)

Back in 2020, I could easily connect my USB MIDI keyboard to amsynth on Ubuntu right through the USB port without a single issue. Later on, ...